Showing posts with label embroidery. Show all posts

Tuesday, 5 February 2013

Embroidery Class 2012 in review - Pulled and Withdrawn Thread Work

The third module of the basic course was Pulled and Withdrawn Thread Work. I had no experience at all of this going in and was excited to try.  They are worked on evenweave fabric with threads that can be removed, rather than an Aida or Hardanger which has a stiffer weave. Linen is the best.
Pulled thread work used tight tension to pull the threads together to form patterns. Withdrawn thread work removes weft or warp threads and then manipulates the remaining threads. Easier to show than to tell!

We worked a sampler for each technique, and put some hemming techniques on each one also. Then as our assignment we had to make a small project that contained 1 hem and examples of each.
Again, as these are samplers, I've scanned them and labelled them for future reference.
This is my withdrawn thread sampler:

Withdrawn thread sampler.
It contains several ways of treating the leftover threads: ladder and zig-zag hem stitch, three styles of interwoven hemstitch, some wrapped hemstitches, and an Italian double hemstitch in both ladder and zig-zag. It also shows a Picot hem stitch at the top, and a corner example with a spider's web interlacing.

And here is my pulled thread sampler:

Pulled thread sampler.
This has both straight and diagonal stitches as well as a variety of eyelets, a 4-sided stitch hem at the base, and a traditional hem stitch at the top.

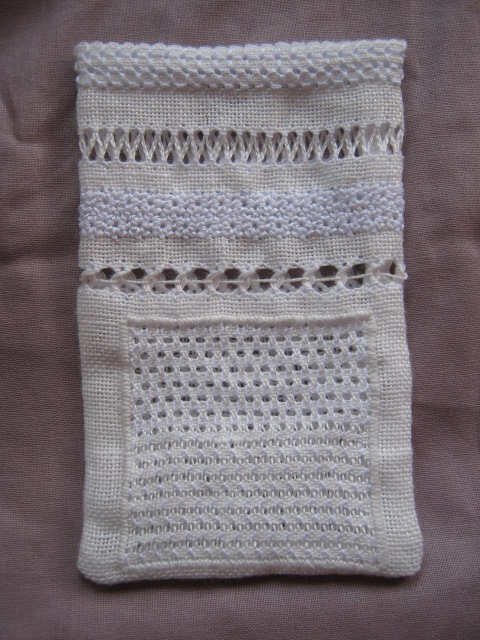
For my project, I did a small bag that could be used as a smart phone cover. I did a deep 4-sided stitch hem at the top, zig-zag ladder hemstitch, a double row of 3-sided eyelets (which I think look like little flowers), and some interlaced hemstitch.  Then there are two satin-stitch edged squares. The one on the front has a spaced satin stitch and a wave stitch.

Small bag assignment - front - featuring pulled and withdrawn work.
The one on the back has two diagonal stitches: diagonal cross stitch and step filling.

Small bag assignment - back - featuring pulled and withdrawn work

It ended up being a cm shorter than it needed to be, so I might line it with a dark fabric that extends up at the top. Or I'll wait and buy a smaller phone. Or use it for something else.

I've fallen in love with this style. It needs a lot of preparation, with proper gridding of the fabric, and the withdrawn thread work and the various hems (4-sided in particular) take a lot of time to set up. But the actual pulled work and hemstitches are fast once you've done the preparation, I love the texture it produces, and for white on white... magical.

I've started a piece to be a back sleeve for my kindle - i.e. one that can be on while I'm reading it, to protect the back from my finger smudges.

Kindle sleeve underway 

You can see that I still have sections on either side of the central row of eyelets to fill in.The outline is the first stage of the 4-sided stitch hem - the rest will be done after the corners are mitred.

Monday, 4 February 2013

Embroidery Course 2012 in review - Counted Thread Embroidery

The second module of the year was Counted Thread Embroidery, with sub-topics of counted cross stitch, Assisi work, blackwork, Hardanger and pattern darning

I've been doing counted cross stitch since I was five years old, so I wasn't anticipating much from that section. We covered the basics very quickly and moved onto some variation stitches, and talked about design. Our project for this topic was to make a name badge - design it, stitch it, assemble it. I knew that stitching my entire first name in cross stitch could make the name badge relatively big, so I did the first letter as a decorative capital in plain cross stitch and the rest of my name in backstitch.

My counted cross stitch assignment name badge

We had to show several variations, so I used long-armed cross stitch for the borders (with one corner on a diagonal) and double cross stitch in the other corners. The decorative 'stars' or 'flowers' are interwoven cross stitch.
The core of the badge is template plastic - better than card, as that makes it washable. I used a decorative double knot stitch (a stitch from surface embroidery) to cover up the joins, and used buttonhole to add the brooch back. Buttonhole is the best stitch for adding these sorts of things - press studs, too.

Double-knot stitch acts a near finish to the stitched seam.

Blackwork is another topic where I had some experience, but I picked up so many good tips on making my Holbein (double-running) stitch look more even.  We had to work the given pattern, to show the way stitches can be gradually built up to give a depth and intensity. It isn't reversible, which is a shame, as that is part of what I really love about blackwork, but I do like it.

The blackwork pattern worked in class. 
 We were asked to finish it as a bag. I didn't add a drawstring to it, and I'm currently using it as a bag for my Kindle!

The blackwork design made up into a bag. 
Assisi work combines the previous two techniques, and is basically where you work the background in cross stitch, leaving the motif, outlined in black, in the background fabric. Traditional Assisi work is very ornate and tends to be religious or floral patterns. The order matters for formal Assisi work - the first step is to do the outlines in double running stitch. Lots of modern Assisi patterns say to do it in backstitch, but double running doesn't give a shadow. Then you fill in the background, and then you stitch the ornate borders. We didn't have a lot of time for Assisi in class, and I stitched only a few small examples.


The small bird is very traditional, with its border. The bow is my attempt at a modern Assisi design.

The two techniques that I hadn't done at all before were pattern darning and Hardanger.
Hardanger I'd seen before, of course, as it is very popular, but I'd never tried it. I liked the stitching process itself- lots of precision counting - but the cutting of the threads was nerve-wracking. I discovered my scissors are not as good as I'd thought - or my scissor technique sucks. I was working in colour on white for our work in class, but switched to white on white for my assignment piece, because that way the tiny threads that remained weren't so obvious.  I made a bookmark, and placed a white grosgrain ribbon behind the design. That way I got some contrast, to show the design, but still white, so didn't make the threads obvious again.

My hardanger bookmark assignment.
I liked this technique, but unless I had a specific gift in mind I don't think I'll be doing a lot of it again. Not my favourite.

Pattern darning is awesome. You create a pattern by weaving a thread in and out of the fabric to create a reversible design. Our class project was a bookmark made on a piece of aida band, which was easy as each line of the band took its own threads, and they ended in the fringe (anchored with a buttonhole stitch).

Pattern darning bookmark front.
Pattern darning bookmark back.
Many other patterns are far more intricate and complicated, and I've been experimenting a bit with this technique and fully intend to do more.

So while I entered this module expecting to get a limited amount out of it, given my prior knowledge of counted thread work, I'm very happy with how much I learnt.

Wednesday, 30 January 2013

Embroidery Course 2012 in review - Surface Embroidery

I'm about to start the second year of the Basic Course offered by the NSW Embroider's Guild, and I thought it was time to review the first year here on the blog.

The first subject we did was Surface Embroidery, which is a difficult category really as it includes so many stitches, and in some way can be defined by negatives (not counted, not on canvas, etc).
Most countries have their own embroidery traditions, so identifying surface stitches can be challenging, as the same stitch can have multiple names. With the growing impetus towards professionalisation and categorisation of needlework at the turn of the 20th century, particularly in Britain, there was a push to create standard names and examples of stitches. They were allocated into four loose groupings - chain, knot, loop and straight.

The classes for this subject were largely learning and practicing specific stitches as well as general presentation and finishing tips. We talked a little bit about how colour and thread choice can dramatically change the way stitches look. Most of our work was carried out on a 'doodle cloth' for experimentation, so we wouldn't worry about mistakes.

My doodle cloth
Our class assignments were to create samplers for each group of stitches.

Flat and Loop Stitches

Knot and Chain stitches
I didn't have any grand plans for my sampler designs, so I kept to a relatively small colour pallette and decided to use the name of the stitch group as a feature in each one. The point of a sampler, of course, is to give yourself a reference for the future, so all the samplers have been scanned and the scanned copies clearly labelled.

Tuesday, 1 January 2013

Vintage gloves and Christmas gloves

I love vintage clothes but suffer from one major drawback when it comes to buying them: I'm overweight.
Truth be told, even if I got down to my ideal target weight, I'd still be built on somewhat hefty lines for most vintage clothes. So when we were at an auction, the only things I thought might fit me were a men's dinner shirt and vest (I was correct; they are great) and gloves. As a result, I got a bit trigger-happy with my bids on gloves. I ended the day with 27 more pairs of vintage gloves than I'd started with.

Many vintage gloves - these ones fit me.

More vintage gloves - these ones are a bit tight.

Even more vintage gloves- these ones don't fit at all
My mother got quite excited when I posted some photos of these after I'd bought them and when she was over for my sister's wedding she tried on a few pairs. She fit into and took some lovely small kid gloves.

Vintage kid gloves. 

She also liked the look of some chamois gloves, and I agreed to decorate them with some embroidery as a Christmas present. I was happy to have gloves that weren't a fantastic fit given to a new home, and I always like giving gifts that I've spent some time and love embellishing.

These fit me but are a little short in the fingers, so I was happy to gift them.
  I decided on a small spray of fern stitch leaves and colonial knot berries to make a pattern around the hem of the cuff. Very Christmas gloves.

The decorated gloves.

A close up of the embroidery.
Among the gloves I bought were a few with embroidery; unfortunately those ones were too small for me:

The most gorgeous embroidered kid gloves. It looks like tambour chain to me. 

Lovely embroidered vintage gloves. Shame these were too small.
The next glove project is to select some of the many cream pairs that fit me - see the first photo, above - and embroider them in the style of these ones.

Tuesday, 6 November 2012

Rogue Trader Cape

My husband is playing in a long-term roleplaying and LARP campaign set in the Warhammer 40K universe, as part of a Rogue Trader crew. Their crew is consistently the best costumed (here is a picture of them from last year - I wasn't able to find a link to a more recent photo), but his outfit at the moment is made up of pre-existing pieces put together, nothing custom made for this character.

I'm making him a short cape to go over his outfit, and to make it very special I'm embroidering a symbol on the back. I'm using the Truly Victorian 1890's Cape pattern TV590, not because I think it is the best 40K look I can find but because it is one I have access to! I'm going to use some interlining to make the shoulders stronger and more masculine, but this Rogue Trader crew is all about the gaudy, so a Victorian pattern seems to fit that. The fabric has a nap, and looks like suede. The colour of the fabric has not come out clearly in these photos, it is a darker, warmer red than that. The lining will be in a gold; I haven't found quite what I'm looking for but as it should take some time to finish the embroidery I have plenty of time to look.

They have a crew symbol, and his own symbol is very slightly modified from that - the skull at the centre has a monocle.

I've just started doing the embroidery on the back. I'm doing the outlines of the empty shapes in chain stitch with DMC metallic gold thread (two strands). I traced the lines I needed onto greaseproof paper, basted over it with white thread, and then ripped the paper off, so I could embroider over the guide lines.
For the solid sections, I'll pad with yellow felt and satin stitch over the top. I'm leaving the words til last I think, as they'll be the most fiddly.

Here it is, ready for me to start the second phase of the embroidery.

I'll post more updates as the cape continues. I hope it looks quite striking when it is done. I'm quite pleased to have something I can craft and give as a gift to my husband - he's a very hard man to craft for. He's been involved with the planning of this from the start, and it has been fun getting him to make decisions about collars and styles of cape front and what embroidery stitch he wanted me to use (although he did say 'I can't really see much difference between them' when given five different stitch options. Sigh)

Thursday, 2 August 2012

Rhiannon's hat - the final stage

As Tanith mentioned in this post on the victorian/steampunk mini-top hat, she handed it over to me in an almost complete state. All that was needed was to do something to cover the working stitches on the lining of the brim. Usually she'd use a trim – perhaps a braid – but not only was there nothing in her stash that looked quite right, we wanted to give me a chance to contribute to the hat. This was important to me, as I often feel that she's being so generous making me these amazing hats and I'm not really helping at all!

So it was decided that I'd cover the stitches with a line of embroidery. I settled on oyster chain stitch, for two reasons. It looks nice both in a straight line and on a slight zig-zag, so I knew it would look fine if it had to deviate a little to properly cover the working stitches. I also like the way it gives an effect almost like a string of tiny beads.

Oyster chain isn't a difficult stitch. It starts with a twisted chain stitch (figure 1), then the needle passes under the top of the stitch (figure 2) so the thread lies snugly up along the side of the twisted chain. Then a loop stitch is made around this, with the needle going in at a and coming out at b. The end stitch should look something like figure 3 except more snug – it is hard to draw what it should look like where the threads should lie next to each other just using a solid line, sorry – and the thread is now ready to start the next twisted chain. My illustrations aren't the most sophisticated or clear, I'm afraid, but I hope you get the gist.

oyster stitch instructions

In this picture, I'm in the middle of doing the twisted chain.


And here is the final result!


I'm quite happy with the way it looks. I did the stitching in two strands of black embroidery cotton, and was worried that it wouldn't be a strong enough visual line, but now I'm glad I didn't use more threads or a thicker perle thread.

It made a beautiful crowning touch to the outfit – the full effect of the hat is destroyed by the fact that I'm squinting down to get the sun out of my eyes in this photo, but all the photos taken at the actual event are very dark and the hat is obscured.