Showing posts with label samplers. Show all posts

Tuesday, 5 February 2013

Embroidery Class 2012 in review - Pulled and Withdrawn Thread Work

The third module of the basic course was Pulled and Withdrawn Thread Work. I had no experience at all of this going in and was excited to try.  They are worked on evenweave fabric with threads that can be removed, rather than an Aida or Hardanger which has a stiffer weave. Linen is the best.
Pulled thread work used tight tension to pull the threads together to form patterns. Withdrawn thread work removes weft or warp threads and then manipulates the remaining threads. Easier to show than to tell!

We worked a sampler for each technique, and put some hemming techniques on each one also. Then as our assignment we had to make a small project that contained 1 hem and examples of each.
Again, as these are samplers, I've scanned them and labelled them for future reference.
This is my withdrawn thread sampler:

Withdrawn thread sampler.
It contains several ways of treating the leftover threads: ladder and zig-zag hem stitch, three styles of interwoven hemstitch, some wrapped hemstitches, and an Italian double hemstitch in both ladder and zig-zag. It also shows a Picot hem stitch at the top, and a corner example with a spider's web interlacing.

And here is my pulled thread sampler:

Pulled thread sampler.
This has both straight and diagonal stitches as well as a variety of eyelets, a 4-sided stitch hem at the base, and a traditional hem stitch at the top.

For my project, I did a small bag that could be used as a smart phone cover. I did a deep 4-sided stitch hem at the top, zig-zag ladder hemstitch, a double row of 3-sided eyelets (which I think look like little flowers), and some interlaced hemstitch.  Then there are two satin-stitch edged squares. The one on the front has a spaced satin stitch and a wave stitch.
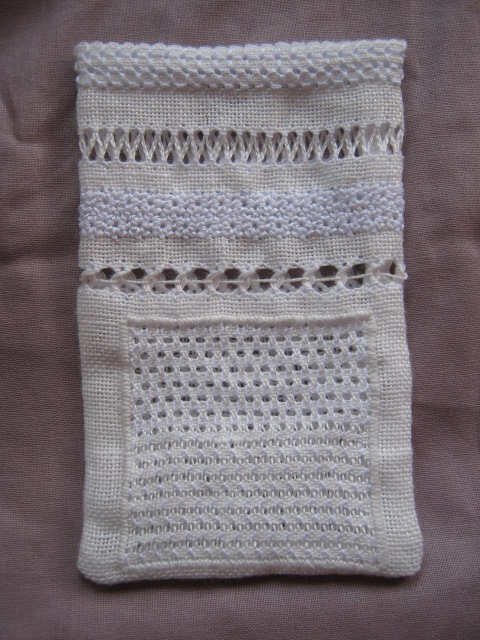
Small bag assignment - front - featuring pulled and withdrawn work.
The one on the back has two diagonal stitches: diagonal cross stitch and step filling.

Small bag assignment - back - featuring pulled and withdrawn work

It ended up being a cm shorter than it needed to be, so I might line it with a dark fabric that extends up at the top. Or I'll wait and buy a smaller phone. Or use it for something else.

I've fallen in love with this style. It needs a lot of preparation, with proper gridding of the fabric, and the withdrawn thread work and the various hems (4-sided in particular) take a lot of time to set up. But the actual pulled work and hemstitches are fast once you've done the preparation, I love the texture it produces, and for white on white... magical.

I've started a piece to be a back sleeve for my kindle - i.e. one that can be on while I'm reading it, to protect the back from my finger smudges.

Kindle sleeve underway 

You can see that I still have sections on either side of the central row of eyelets to fill in.The outline is the first stage of the 4-sided stitch hem - the rest will be done after the corners are mitred.

Wednesday, 30 January 2013

Embroidery Course 2012 in review - Surface Embroidery

I'm about to start the second year of the Basic Course offered by the NSW Embroider's Guild, and I thought it was time to review the first year here on the blog.

The first subject we did was Surface Embroidery, which is a difficult category really as it includes so many stitches, and in some way can be defined by negatives (not counted, not on canvas, etc).
Most countries have their own embroidery traditions, so identifying surface stitches can be challenging, as the same stitch can have multiple names. With the growing impetus towards professionalisation and categorisation of needlework at the turn of the 20th century, particularly in Britain, there was a push to create standard names and examples of stitches. They were allocated into four loose groupings - chain, knot, loop and straight.

The classes for this subject were largely learning and practicing specific stitches as well as general presentation and finishing tips. We talked a little bit about how colour and thread choice can dramatically change the way stitches look. Most of our work was carried out on a 'doodle cloth' for experimentation, so we wouldn't worry about mistakes.

My doodle cloth
Our class assignments were to create samplers for each group of stitches.

Flat and Loop Stitches

Knot and Chain stitches
I didn't have any grand plans for my sampler designs, so I kept to a relatively small colour pallette and decided to use the name of the stitch group as a feature in each one. The point of a sampler, of course, is to give yourself a reference for the future, so all the samplers have been scanned and the scanned copies clearly labelled.