Tuesday, 30 October 2012

Pre-Halloween Craft Party

On the weekend I had some friends over for an afternoon of Halloween cupcake-decorating and pumpkin painting (and an excuse for more gross punch) and an All Hallow's Read Secret Skeleton.

Having tested some cupcake designs earlier, I decided the best ones were the Owls and the Creepy-Crawlies, so I got the stuff for those and we started with those. Then we improvised, with extra help from a bag of lolly facial features.

First up, here's the punch. Another round of frog spawn punch...


...and a second go at eyeball punch. The colour wasn't as good on this eyeball one because I mixed in some juices and soft drinks with a less vibrant colour.


Then later the colour leached out of the black jelly at the bottom and turned it all disgusting. Plus the eyeballs were starting to disintegrate.


Secret Skeleton was fun. We had struggled with knowing appropriate age books for kids, but it seemed to go ok.

Then we started on the cupcakes. Owls and creepy-crawlies (including chocolate-coated sultana ants)


Then the moustaches and mouths came out!


Oh no! I ate a bug!


Early Christmas Special - Demon Rudolph.


And with the most mutated mouth award, demon zombie panda.


I wanted to try painting on pumpkins this year for a few reasons. One, as I mentioned in my introduction to this year's Halloween series, is having no desire to set fire to anything in my house. Also it isn't dark when trick-or-treaters come. Also, good carving pumpkins are not easy to get or cheap here. I carved a Queensland blue once and it was very hard physical labour. So I picked a pumpkin I like to eat, and we painted instead.


Can't wait to eat some pumpkin.


I blatantly copied mine from the colouring-in sheets I'd printed for the kids.


What a fun Halloween-y day! Although I think we all had severe sugar crashes.

Monday, 29 October 2012

Why Pinterest just isn't working for me

I avoided Pinterest for a while not because it didn't look interesting but because it did. I needed another site to be caught up in about as much as I needed more hobbies. But I finally caved, because as my lacklustre attempts at healthy eating reveal, I don't have enough willpower to avoid temptation.

Fortunately, or unfortunately, depending on perspective, I don't really like Pinterest. Clearly I had a vision in my head of what it would it be like, and when it failed to live up to that vision... I guess when you have a heap of things demanding your attention, it is easier to dismiss the ones that don't quite work for you. And Pinterest doesn't do it for me.

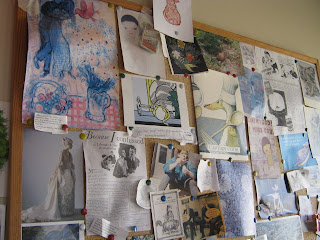
Part of the problem is the actual physical arrangement of photos. I'm a huge fan of inspiration boards - my current work alcove is plastered with sentimental, inspirational, pretty things to motivate me.


I also have a smaller cork board with wardrobe inspiration pictures.


So I guess I wanted Pinterest to be like that. A cork board on the internet.
But it isn't. The photos are all discreet and separated. Looking at my Pinterest 'wardrobe planning' board doesn't inspire me. It is a useful place to store images and links - but I have a browser bookmark folder for that, and I don't have to worry about copyright when I bookmark a Burda Style pattern.  I can't even work out a way to reorganise the photos in a board.

But I think I could get over that, realise that Pinterest isn't meant to provide the same facility as a real life cork board, and use it the way Tanith does, as a place to store things to try and go back to...
but I also find Pinterest demotivating.
Seeing the abundance of ideas and craft projects and cute things people pin doesn't inspire me. I look at all the pretty items and neat craft patterns and funky short-cuts and realise that there are a huge number of people in the world making largely decorative stuff. Should I be adding to their number?
It makes me question whether the world needs ANY MORE THINGS AT ALL.

While I can always work up enthusiasm for working on specific gifts, for a day after looking at Pinterest, I question our overall goal of ultimately selling our work.
So if I want to craft seriously, I need to stay away from Pinterest.  I've removed all my pins and boards. I haven't deactivated my account yet, as I would still like to keep an eye on what my friends are pinning. And in a few months I'll give it another try. But right now, no Pinterest for me.

Friday, 26 October 2012

Sparklies - mending outside my comfort zone

I like a lot of different crafts, but one I've only briefly dabbled with is jewellery making. I like the idea of it, and I get inspired easily, but actually doing it frustrates me. Part of the problem is wire - I just can't get comfortable manipulating it, and a lot of the suggestions for beginner's jewellery making involve wire. As much as I love crochet, and love the look and idea of wire crochet, the one time I tried it was a disaster.

I like jewellery though. And as part of the new ethical fashion direction (how many times have I typed that since we started this blog?!?) I wanted to do something with two garnet necklaces I own that aren't getting much rotation as they are broken. Kaput.

So while it isn't a hobby I want to do much of myself, faced with two broken necklaces I realised I was going to have venture into the scary unknown.Thankfully I have friends who are much more adept at this realm to give me advice. (Thanks, Linette!)

And nothing involved wire.

Necklace The First: 

I was given this as a present years ago by grandmother I think and I honestly don't recall when and how it broke. All that happened was the string (fishing line) snapped. Fixing this one was a (simple?) matter of rethreading the beads on a new line and attaching the old clasp. It was quite fiddly to get the knots secure and small.


I wore it out to a comedy gig the other night, and I'm happy to have it back in rotation.

Necklace the Second:
Another garnet necklace, this time on a cord, knotted between each bead. I was in the habit of wearing this tied in a knot at my throat, which I thought looked cool, and it all was great until the day I couldn't untie it. At all. I had to cut it off me. Left with a string of garnets, I thought about this carefully. As I was going to mend necklace the first, and I had another string of garnet beads anyway, I didn't need three garnet necklaces in my jewellery box. What I needed was... a bracelet.
I estimated that I had enough length to do a four strand bracelet, so I bought a clasp that had four attachments points. I used embroidery cotton in a close a colour match as I could manage, heavily waxed for strength.
I tied knots, etc, and while the attachment areas look a bit messy, I think they will hold.

the ends do look a little thread-ful

 And I'm very happy with the result. I get a cool, 4-strand garnet bracelet that I can wear, probably not with a garnet necklace, as that strikes me as a bit too matchy-matchy. But I think it gives good wrist coverage. 


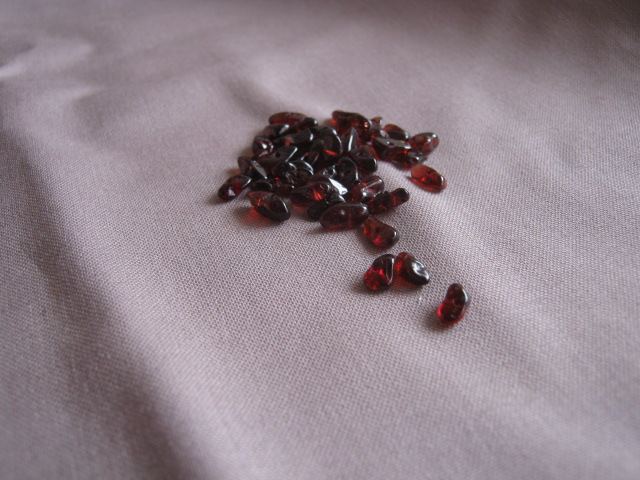
 I even have a small pile of leftover stones that I've cut from their thread and can use in other projects.


I'm not sure I want to do any more jewellery stuff, but I am so happy with how these repair projects have turned out, taking two broken necklaces and giving me two pieces of jewellery I can wear and enjoy.

Thursday, 25 October 2012

Snails!

Another Halloween recipe test.


This was from the Vegetarian Society website and it seemed like a cool-looking idea. Slimy snails full of slimy stuff.


I don't like a bunch of the ingredients so I left them out in my test, and I wasn't really excited about the flavour. I guess that's what you get for messing with recipes! So I can't vouch for whether it would be good as intended or not. I guess you'd have to like gherkins, coriander and spring onions to find out!


But visually, super awesome.


And texturally, yucky! Slimy and weird.

Halloween crochet turnip head

I'm not as in to Halloween as Tanith. I'm not sure why - possibly I don't like scary things as much as she does, or I was older when we were living in the US and more jaded. I honestly don't know. I like many individual things about Halloween - I like pumpkins, I like the idea of making food look like other things, I like candy, I like costuming - but I can't work up much energy over Halloween as a whole, especially in Australia. Whatever the reason, I would largely ignore Halloween if it weren't for her enthusiasm.

However I was part of a LARP game last year where I was playing a turnip-headed creature from the land of Halloween, so I thought I'd throw that in to the Halloween posts.

It was an unpatterned experiment - I just gathered appropriate coloured yarns and started to crochet. I began at the top with the light purples, made it big enough to go over my head, and kept going in rounds until it sat like a little cap on the top of my head. As I started to work in white/cream, I switched to rows, just covering the front, and leaving gaps for eyes and mouth. And then at the base I went into a little circle again, and left some dangling roots/chin hair.
You can see the 'roots' and leaves better in this shot
It is surprisingly good as a mask - I can easily see and speak. It is a bit itchy though, and the leaves have a tendency to dangle down and interfere with my vision, so I have to toss my head to get them to fall back at the sides. After the first time I wore it, I strengthened the base of the leaf stems with some pipecleaner to make them stand up a bit more, which seems to have helped.

Monday, 22 October 2012

Halloween Punch, Round 2

I needed to find a second punch to go with the Frog Spawn, so I experimented a bit.


Blood Orange Agrum blended with strawberries and peach slices. Black-coloured rasberry jelly chunks at the bottom.
 

Lychees with blueberries in the centre to be eyeballs. Once again, thank you Martha Stewart.


I just don't like the texture of the fruit blended in there. For the weekend I think I'll stick to a mix of juices and soft drinks with the same eyeball and black sludge extras. I hope it will also make the eyeballs more visible.

Sunday, 21 October 2012

Cupcake decorating tests for Halloween

After my cupcake-decorating hens night, we were keen to do some more, and Halloween was agreed on as the perfect occasion. And so my pre-Halloween Craft Party was planned. Today I tested out some decorating ideas.

First, I wanted to try making red velvet cupcakes using my mum's recipe which uses grenadine. After putting a few ingredients together and getting this gross-looking concoction, I knew the Halloween baking was off to a good start. Now I need a recipe that looks like this when it's done!


The first decorating idea was creepy crawlies. This comes from "Hello Cupcake" by Karen Tack and Alan Richardson. I used an icing pen for the legs and antennae, where I think they use chocolate, because I happened to find one while shopping for ingredients.


Then the bodies are made out of M&Ms.


I stuck to centipedes and spiders, but in the book they do ticks, scorpions and ants as well.


Things I learned - centipedes need longer legs than you think, and a bend in their body to look creepy. The redbacks managed scary easily enough (well, scary for something made of sugar).


Next up was eyeballs. Inspired by this lady on Martha Stewart. I had some trouble with the eyeballs. The pupils are slices of soft liquorice, the irises and red streaks are bits of jelly snake. The problem? The snakes kept wanting to straighten up again. Any suggestions?


Then I switched to cream cheese icing and some brains. I saw some on Pinterest and it looked so easy! At first my icing was too runny and the brains sunk and lost their shape. Even when I thickened it up it still wasn't as easy as I had imagined. (I kinda hate people who make the beautiful foods you find in cookbooks and on the internet. It looks easy. I just can't do it!)


Then some owls. These are also from Hello Cupcake.


Again, piping the feathers etc was harder than it looked (I've done that before though, and maybe butter cream icing is a better consistency for it) and my oreos just wouldn't come cleanly apart! But it is a super-cute design so I think it still works.


Looking forward to trying to perfect some of these designs next weekend at the Craft Party.

Saturday, 20 October 2012

Deflation and Re-inflation

Getting sick took away a lot of my energy and then what with work and other things I just couldn't build back up the momentum I had before. But today is a new day, and with the extremely skilful counselling of my husband, I'm feeling inspired again.

One thing he said was that maybe I could donate some of the stuff I make, if we are not yet ready to launch our shop. Then my facebook page had a link to a handmade toy drive. Things do tend to fall into place, don't they?

So I will be donating the little puppy and maybe even Hedgie and anything else I make by then with no intended owner to Softies for Mirabel. They probably wouldn't be able to find a child to appreciate a compost monster.

This little pup wants a new home

Sunday, 14 October 2012

Soft toy rises from the dead

I'm back! Still a bit sick. What a shocker of a week! But at least there was surprise spring snow.


I have managed to get one crafty thing done this weekend, thank goodness. It feels like a week has just been sucked out of my life. I made a Zombie Bear!


Zombie Bear was undoubtedly sparked into life by the crashing of this huge branch down onto his little Soft Toy grave in the back yard.


He is from a pattern by DIY Fluffies and he is pretty awesome. It was a good pattern with instructions that were mostly clear (a few little bits could be improved but overall ok). The skill level was listed as Intermediate and I would agree. The instructions assume you have sewing experience already and don't take you through the steps in detail. Lots of fiddly little bits to sew on (eyes, nose mouth, scars, patch stitches etc) but for once I was sensible and did as much as I could by machine so he was still all done in one day (and I slept in!).


His intestines are completely removable!

He is a bit of a Frankenstein's monster as well as a zombie, made of the remnants of many past and discarded craft projects.


His back is a little plain. I think if I made him again I might make a few small changes to the construction and maybe add some more to his back. Overall I'm very happy with this pattern and project. Luckily I bought 2 more of her patterns so there is lots of fun yet to come!

Wednesday, 10 October 2012

Vintage crochet - the introduction

Tanith has been powering out blog articles this month and has made me feel lazy. As I'm at a point where I need to scrounge for photos before I can do many more, I've filled in with a post where I can grab the photos from the net!

Vintage crochet patterns are lovely and surprisingly easy to find. 
I get lots through the reprints done by Bramcost Publications - you can order their stuff through Amazon, and I always get the parcels from them weeks ahead of the shipping estimate.  Another good source is the searchable newspaper archive Trove, which now has the Australian Women's Weekly. (I wish it had been so during my thesis, but never mind. Those hours I spent going through the AWW on microfilm are a source of fond memories and lots of 1940s short stories.)

AWW, Feb 4 1953. An example of the sort of patterns you can find.

They now have a new trial interface for the Australian Women's Weekly here, which makes searching for craft patterns so much easier. You can also get all wistful about the patterns, particularly dress patterns, that are described and pictured but are to be sent away for...
Send away... annoying words to read. AWW, 29 Oct 1958

Trove also has the Illustrated Sydney News and the Australian Town and Country Journal, which have the advantage of being very old, totally out of copyright, but I have to admit the quality isn't amazing and it lacks the cool trial interface of the AWW. 
Jan 4 1905, Australian Town and Country Journal.

 See what I mean?

Of course, vintage patterns also have some drawbacks - the biggest being the complete lack of gauge. Modern patterns almost always have this, except for afghans or scarves or items where the finished size can vary and it doesn't make a lot of difference. Vintage patterns almost never do, and the ones that occasionally do are striking for that alone.

A tension given! A miracle. AWW, 24 Aug 1946
A lot of patterns just give the hook size (sometimes in a specific brand) and the thread/yarn details. The pattern above gives way more details than many.  Without knowing enough about the yarn (and often they are out of manufacture; one of the good things about fine thread work is that a No 20 crochet cotton is much the same today as in 1940) and no tension gauge given, working out what you are making will be too small or too big often doesn't happen til mid-way through - or even the end.

As a result, vintage crochet requires a lot of trial and error. I'll show some of the trials, errors and successes in a later post.